XbotGo Falcon

How to Record Youth Sports Games: A Parent's Guide (2026)
Every sports parent knows the trade-off: film the game, or watch it. The camera demands so much attention that you are never quite present — and you are still afraid of missing the one moment that mattered.
You don't have to choose. Below are the techniques that let you capture clean, watchable footage while actually enjoying the game.
Let AI Do the Filming
Handheld filming is where most of the frustration comes from. Players change direction faster than you can pan, the footage comes out shaky, and you spend the game looking at a screen instead of your child. The fix is to stop being the cameraman.

The XbotGo Chameleon uses your phone as the camera: the phone slots into the mount and records, while the Chameleon supplies the AI co-processor and the motor that turns to follow play. It covers 10+ sports, sets up over Bluetooth, runs 8 hours per charge, and in basketball mode can lock onto an individual by jersey number. Recording quality follows your phone, with 4K available in the team-sport modes.
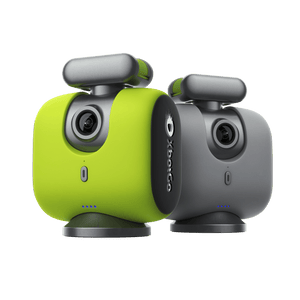
One question decides which tier suits you: are you willing to leave your phone on a tripod for the whole game? If not, the XbotGo Falcon removes the phone from the equation — a standalone camera with dual AI lenses and a 6-TOPS on-board AI chip. It records native 4K/30fps (or 1080p60 on the latest firmware for half-speed replays), is IPX5 weather-resistant, runs about four hours per charge, and takes a microSD card up to 1 TB (sold separately). New features tend to reach the Falcon first.
Both tiers include 20 GB of free cloud storage and one-tap streaming to YouTube, Facebook, or any RTMP destination, with no subscription for core recording, tracking, or streaming. (XbotGo's AI Analysis is announced as a separate upcoming paid add-on.)

Can You Record a Game on Just Your Phone?
Yes. A modern phone on a tall tripod at 4K/30fps is good enough for team sharing and highlight reels. The phone is not the weak link — heat, storage, and battery are.
Heat costs parents whole games. A phone in direct sun, recording continuously, will eventually throttle or stop. Shade it, take the case off so it can shed heat, and drop from 4K/60 to 4K/30.
Storage disappears faster than people expect — a full game at high resolution can run to tens of gigabytes. Check free space the night before, record halves rather than one unbroken file, and clear last weekend's games before you leave.
Battery is the easiest to solve and the most often forgotten. Bring a power bank and plug in at half-time. Better still, retire an older phone into service as a dedicated game camera — no SIM, no notifications — which removes most of these problems at once. For more, see our guide to filming soccer games on a phone.
Camera Position and Angles
Before the game, scan the venue for anything that will get between the lens and the play: spectators' heads, fencing, dugouts, trees, low ceilings indoors, and glare. That check tells you how much elevation you need. The halfway point is the default position — consistent framing wherever play happens.
How High Should the Camera Be?
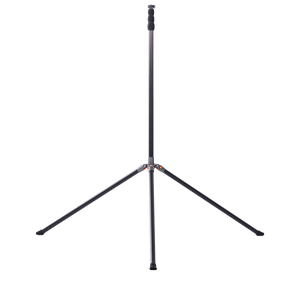
Height does more for your footage than any setting in the menu. From chair height you film the backs of other parents; from above the crowd you film the game. The practical floor is about eight feet, which clears standing spectators, and most families filming full-sided games land between there and roughly thirteen feet, where team shape becomes visible rather than just the ball.
Height brings one problem: wind. A tall tripod is a sail, and a gust that tips it over ends your recording. Weight the legs — most tall tripods have a hook under the centre column for exactly this — spread them wide, and stay near the tripod during the game.
Where to Stand for Each Sport
The right position follows the shape of the playing area, not the sport's name:
| Sport / format | Where to put the camera | Why it works |
|---|---|---|
| Small-sided soccer (7v7) | Behind a goal, set back 10–20 yards | One end covers the whole field, and you get attacking play head-on |
| Larger-sided soccer (9v9, 11v11) | Halfway line, as high as you can get, or diagonally off a corner | A full-size field is too long to shoot from one end without losing the far half |
| Goalkeeper-focused filming | Directly behind the middle of the goal, around 8–10 feet up | Almost all of a keeper's decisive moments happen inside that field of view |
| Basketball | Baseline at one end, elevated; switch ends at half-time | A court is short enough that one end frames the whole floor without heavy panning |
| Baseball and softball | On or beside the backstop, behind home plate, wide lens | Play is spread across a diamond in long pauses, so a fixed wide angle beats chasing the ball |
| Indoor courts (volleyball, futsal, handball) | Sideline at mid-court, raised as far as the ceiling allows | Low ceilings cap your height, so the mid-court sideline recovers the coverage you lose |
Baseball deserves a note of its own, because the sport works against ball-following cameras. The action jumps between pitcher, batter, and a fielder fifty yards away. A fixed wide shot from the backstop captures all of it, while a tracking camera spends the game swinging between them. We go deeper in our guides to recording basketball games without a cameraman and recording a soccer game hands-free.
Check the Venue's Filming Rules First
Plenty of tournaments restrict elevated setups and tripods — sometimes because they sell their own film, sometimes for crowd safety — and officials do ask people to take rigs down mid-game. Ask the organizer before you travel, and check whether your league restricts where footage can be posted. In most public US venues nothing stops you filming your own child's game, but venue and league rules still apply.
The Right Settings
Resolution and frame rate. 4K at 30fps is the right default — high detail, but kind to storage, battery, and heat. Frame rate is a trade-off, not a "higher is better" dial: step down to 1080p if you want 60fps for slow motion. Most cameras, the Falcon included, offer the higher frame rate at 1080p rather than 4K.
Focus and shutter. Let auto-focus handle fast-moving players. For manual control, 1/1000 or above paired with a wide aperture works best for fast play, and ISO needs boosting indoors.
Low light. Evening kick-offs and dim gyms are where phone footage most often disappoints. Open the aperture wide, accept a slightly slower shutter than in daylight, and — the single most useful habit — shoot wide in 4K and crop afterwards rather than zooming live, which avoids the grain.
Stability and storage. Mount the camera on a gimbal or tripod; handheld shake ruins fast-paced footage. Save to an SD card and the cloud, so one failure doesn't cost you the memory. A quick pre-game checklist — battery charged, space free, settings confirmed — prevents most disasters.
Keep the Auto-Tracking Locked on the Play
Tracking that loses the game is the most common complaint about the whole category, and it is usually fixable. It rarely fails because the AI is confused about what a game looks like — it fails because of where the camera is standing and how it is set up.
Get height. At head height the camera sees a crowd of legs, a warm-up ball, and the game on the next field, all at roughly the same size. Raised above the spectators and angled down, it sees a field with players on it. If tracking wanders during warm-ups but settles at kick-off, height is almost always the cause.
Back off the touchline. Set up too close and passers-by fill the frame and outrank the actual game. A few extra yards trades a slightly smaller subject for tracking that stays put.
Check settings before the whistle. Select the correct sport mode — tracking logic differs between continuous play and stop-start sports — enter field dimensions if the app asks, and set recording quality deliberately rather than leaving last season's value.
Multi-field complexes are the hard case. Give the camera as little competing action as possible: raise the height, angle down onto your own field, and position so neighbouring games sit behind the camera rather than beside it. Both XbotGo tiers let you watch the live frame from your seat, which turns a lost ten minutes into a lost ten seconds.
After the Game: Organize, Edit, Share
Tag moments as they happen. The habit that saves the most time costs nothing: note the clock in your phone's notes app — "12:40 save, 31:05 goal" — and an hour of scrubbing becomes a two-minute job. A Bluetooth remote's marker button does the same without you looking away.
Name files before you upload. "2026-04-12 U12 v Riverside — full game" tells you everything in a year's time; "IMG_4471" tells you nothing.
Edit without overcomplicating it. iMovie, Filmora, and Adobe Premiere Pro all do the job, and Premiere's batch processing helps when a tournament weekend becomes reels for several families. Faster still: upload to the XbotGo cloud for auto-generated highlights you can trim in the app — full walkthrough in our guide to building highlight reels.
Share with an unlisted YouTube playlist. This is the free workflow most team parents settle on. YouTube absorbs the file size so nobody emails 40 GB around; unlisted keeps minors' footage out of public search while staying easy for a grandparent to open; and the playlist becomes the season archive by default. Keep two copies of anything you'd hate to lose — local card plus cloud. Streaming to family who can't attend is a related job: see our guide to livestreaming youth sports.
One caution if this is heading toward college recruiting: a recruiting reel is not a season archive. Coaches consistently ask for two to three minutes of best action, no music, no graphics beyond a name and class year, and full-game film available separately.