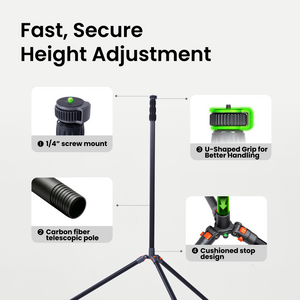
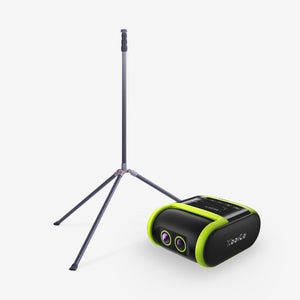
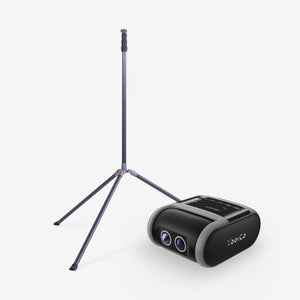
XbotGo Falcon

Hockey Skate Lace Size Chart: The Complete Guide
Ever watched a player struggle with loose skates mid-game? Or seen someone hobble off the ice with lace bite? These common hockey nightmares often trace back to one overlooked detail: using the wrong lace size or technique.
Why Lace Size Actually Matters
Here's the thing about hockey laces—they're not just strings holding your skates together. They're the critical connection between you and the ice, affecting everything from edge control to ankle stability. Get them wrong, and you're not just uncomfortable; you're compromising your entire game.
The Universal Hockey Skate Lace Size Chart
Let's start with what you came for—the sizing chart that works across all major brands:
|
Skate Size Range |
Lace Length |
Length in CM |
|
Youth 8 - Junior 3 |
72 inches |
183 cm |
|
Junior 3.5 - 5.5 |
84 inches |
213 cm |
|
Adult 6 - 8 |
96 inches |
244 cm |
|
Adult 8 - 10 |
108 inches |
274 cm |
|
Adult 10 - 13 |
120 inches |
305 cm |
|
Adult 12 - 15 |
130 - 132 inches |
330 - 335 cm |
But here's what the chart doesn't tell you: sizing varies based on how you tie your skates, whether you skip eyelets, and even the brand of laces you choose.
Waxed vs. Unwaxed: The Great Lace Debate
Waxed Laces: The Grip Masters
Waxed laces stay put. Period. The wax coating creates friction that maintains tension throughout your entire session. They're perfect if:
- Your laces constantly loosen during games
- You're a beginner needing consistent support
- You prefer that "locked-in" feeling
One player shared: "Old waxed laces are prime. I don't like overly waxed ones—just a smidgen of wax gives the perfect grip without being stiff as cardboard."
Unwaxed Laces: The Traditionalist's Choice
Unwaxed laces offer flexibility and easy adjustment. Choose these if:
- You frequently retie during games
- You prefer a softer, more forgiving feel
- You're still experimenting with your preferred tightness
Pro tip: Some players dream of partially waxed laces—waxed in the middle for grip, unwaxed at the top for flexibility. Maybe that's a million-dollar idea waiting to happen.
The Three-Zone Lacing Method That Changes Everything
Forget what you think you know about "tight all over." Professional coaches teach a zone-based approach that revolutionizes comfort and performance:
Zone 1: Toe Box (Tight)
Lace the bottom 3-4 eyelets firmly. This locks your foot in place and provides the foundation for power transfer. Think of it as anchoring your foot to maximize every stride.
Zone 2: Mid-Foot (Loose to Moderate)
Here's where most people mess up. The arch area needs breathing room. Too tight here causes:
- Foot cramps
- Numbness
- Reduced blood flow
As one coach explained: "That middle portion, if I go too tight, I'll cramp up my foot and toes will go numb."
Zone 3: Ankle (Snug but Not Strangling)
The ankle area needs to be snug enough to lock your heel back but not so tight it restricts movement. You need that forward flex for proper skating mechanics.
Conquering Lace Bite: Expert Prevention Strategies
Lace bite isn't just painful—it can sideline you for weeks. Here's how to prevent it:
The Direction Matters More Than You Think
Most people lace like they're tying shoes—inside to outside. That's your first mistake.
Outside-to-inside lacing pulls pressure onto the boot structure rather than your foot. It's a game-changer for preventing that burning ankle pain.
The Heel Lock Technique
- Lace normally until you reach the ankle bend
- Tap your heel firmly into the back of the boot
- Tighten those three crucial ankle eyelets
- Use the top eyelets lightly—just enough to secure
This technique ensures your heel stays locked while avoiding excessive pressure on sensitive areas.
Common Mistakes That Sabotage Your Skating
The Ankle Wrap Disaster
Here's what happens when beginners get creative with excess lace: they wrap it around their ankles thinking it adds support.
Don't do this. Ever.
Wrapping laces:
- Destroys your tendon guard
- Restricts natural ankle movement
- Provides zero actual support
- Makes you look like you learned to skate in 1975
Instead, buy the right length or tie multiple knots. Simple.
The "Tighter is Better" Myth
Players with weak ankles often crank their laces to compensate. This creates a vicious cycle—restricted movement leads to weaker ankles, which leads to tighter lacing. Break the cycle with proper technique and off-ice strengthening exercises.
Real-World Sizing Adjustments
When Charts Lie
One discovered their size 5.5 skates worked better with 106" laces instead of the chart-recommended 84". Another player went the opposite direction, preferring shorter laces for minimal excess.
The lesson? Charts provide a starting point, not gospel. Consider:
- Your lacing style
- Boot eyelet count
- Personal preference for bow size
- Whether you skip the top eyelet
Brand Quirks to Know
Through community feedback, patterns emerge:
- Howies laces run slightly short
- A&R laces offer solid value for beginners
- Elite ProLace provides consistent quality
- Referee laces (yes, really) sometimes offer the best feel with their cotton-heavy construction
Advanced Techniques From the Ice
The Double-Wrap Method
Instead of crossing laces once, wrap them twice before pulling tight. This creates what coaches call a "homemade winch" that locks tension without slipping. It takes an extra second but saves constant retying.
The Top-Eyelet Skip
Many experienced players ignore the top eyelet entirely. This provides:
- Better ankle flexibility
- Easier forward lean
- The option to use shorter laces
If you're using this technique with size 8 skates, you might drop from 108" to 96" laces.
The Extreme Example: Paul Coffey's System
Hockey legend Paul Coffey took lace security to another level. He used two separate sets of laces—one for the bottom, one for the top—and tied them so tight trainers had to cut them off after games.
While we don't recommend this extreme approach, it shows how seriously pros take their lacing system.
Troubleshooting Your Lace Problems
"My Laces Are Too Long"
- Quick fix: Double or triple knot
- Better solution: Buy shorter laces next time
- Pro move: Master the double-wrap technique to use up excess
"They Keep Coming Loose"
- Switch to waxed laces
- Check your ankle-lock technique
- Consider if your boots are too big (requiring over-tightening)
"My Feet Go Numb"
- Immediately loosen the mid-foot area
- Check if your skates are too narrow
- Ensure proper heel positioning before tightening
"My Ankles Collapse Inward"
- Focus on heel lock, not overall tightness
- Strengthen ankles with specific exercises
- Consider custom insoles or professional fitting
Maintenance Makes Perfect
Replace Laces When:
- Fraying appears at pressure points
- They've stretched beyond proper tension
- Aglets (plastic tips) break
- Start of each season (for regular players)
Storage Wisdom:
- Always air-dry wet laces
- Keep spares in your bag
- Check tension before each ice time
The Bottom Line
Getting your lace size and technique right transforms your skating experience. Start with the chart, but don't stop there. Experiment with the three-zone method, try different lace types, and pay attention to what works for your feet and skating style.
Remember, the "perfect" setup is the one that lets you forget about your equipment and focus on your game. Whether you're teaching kids their first crossovers or competing at high levels, proper lacing is the foundation that makes everything else possible.
Take time to dial in your system. Your feet—and your game—will thank you for it.